


Image classification is a fundamental task in computer vision, where the goal is to classify images into predefined categories or labels. PyTorch, a popular deep learning framework, provides a powerful platform for building and training image classification models. In this article, we will walk you through the steps to build an image classification system using PyTorch.
Types of Image Classification
1. Binary Image Classification
Definition: Binary image classification PyTorch is a supervised machine learning task where the goal is to categorize images into one of two classes, typically referred to as the positive class and the negative class.
Key Concepts:
- Positive and Negative Classes: In binary classification, you have two classes, each representing a different category or outcome. For example, in medical imaging, you might classify X-ray images as either showing a disease (positive) or not (negative).
- Thresholding: To make binary decisions, a probability threshold is often applied to the model's output. If the predicted probability for the positive class exceeds the threshold, the image is classified as positive; otherwise, it's classified as negative.
- Imbalanced Data: Imbalanced datasets occur when one class has significantly more samples than the other. Handling class imbalance is a critical consideration in binary classification to avoid biased models.
- Receiver Operating Characteristic (ROC) Curve: ROC curves are used to visualize the trade-off between the true positive rate (sensitivity) and false positive rate (1 - specificity) for different threshold values. The area under the ROC curve (AUC-ROC) is a common metric for model evaluation.
- Precision and Recall: Precision measures the accuracy of positive predictions, while recall measures the ability to correctly identify all positive instances. The F1-score combines these metrics into a single value, balancing precision and recall.
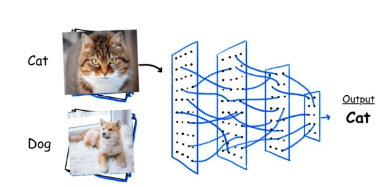
Binary Image Classification
2. Multi-Class Image Classification
Definition: Multi-class image classification involves categorizing images into more than two classes, where each class represents a distinct category or label.
Key Concepts:
- Softmax Activation: In multi-class classification, the final layer of the neural network typically uses softmax activation, which assigns probabilities to each class. The class with the highest probability is the predicted class.
- Cross-Entropy Loss: The cross-entropy loss (often called categorical cross-entropy) is commonly used in multi-class classification. It measures the dissimilarity between predicted probabilities and true class labels.
- One-Hot Encoding: In multi-class datasets, class labels are often represented using one-hot encoding, where each class is a unique binary vector element.
- Top-k Accuracy: Instead of considering only the top-1 prediction, top-k accuracy measures how often the correct class is within the top-k predicted classes. This is useful when an image can belong to multiple classes.
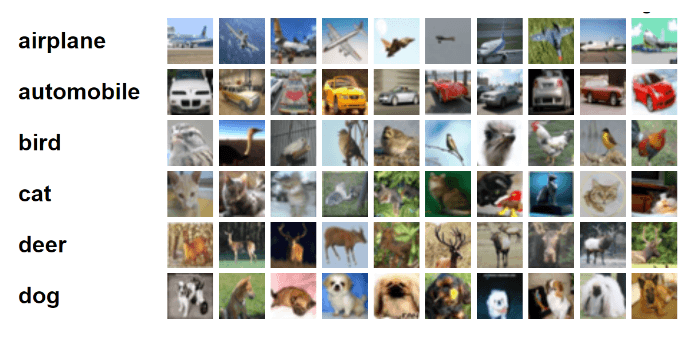
Multi class image Classification
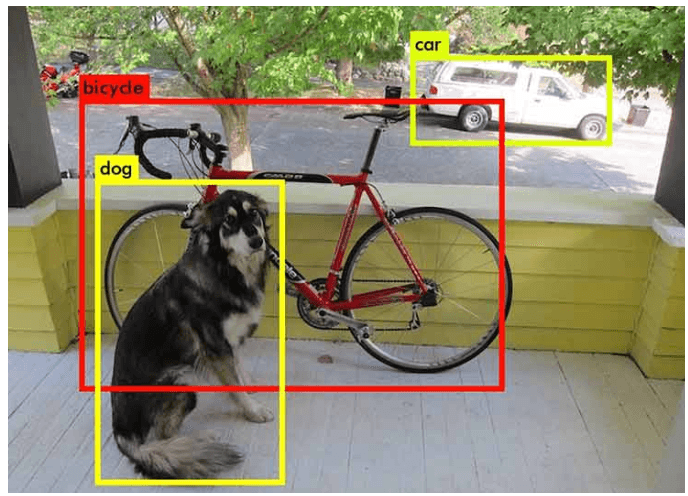
3. Object Detection
Definition: Object detection is a task where the goal is to identify and locate objects of interest within an image and assign them to specific classes. It often involves drawing bounding boxes around detected objects.
Key Concepts:
- Bounding Boxes: Bounding boxes are rectangular regions that enclose detected objects. They are represented by coordinates (x, y) of the top-left corner and (width, height).
- Anchor Boxes: In some object detection methods, anchor boxes of different sizes and aspect ratios are used to detect objects of various shapes and sizes.
- Intersection over Union (IoU): IoU measures the overlap between the predicted bounding box and the ground truth bounding box. It's used to assess the quality of object detection.
- Non-Maximum Suppression (NMS): NMS is a post-processing technique used to eliminate redundant bounding boxes by selecting the one with the highest confidence score.
Object Detection
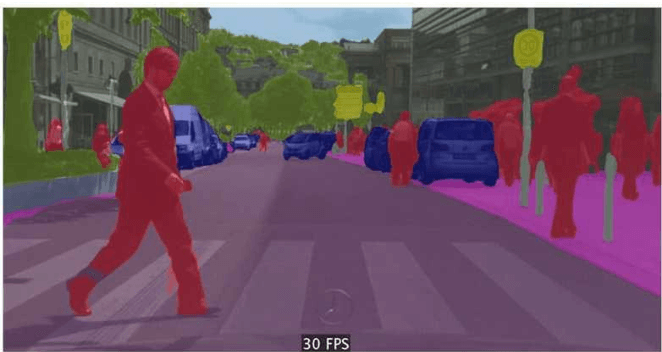
4. Semantic Segmentation
Definition: Semantic segmentation is a pixel-level image classification task where each pixel in an image is assigned a class label to distinguish different objects and regions.
Key Concepts:
- Pixel-wise Classification: Instead of classifying the entire image, semantic segmentation assigns a class label to each pixel, resulting in a pixel-wise classification map.
- Fully Convolutional Networks (FCNs): FCNs are neural network architectures designed for semantic segmentation. They use convolutional layers and skip connections to capture both local and global context.
- Class Imbalance: Handling class imbalance is crucial in semantic segmentation since some classes may be rare compared to others.
- Loss Functions: Common loss functions for semantic segmentation include cross-entropy loss and Dice loss, which focus on pixel-level accuracy.
Prerequisites
Before we dive into building our image classification system, make sure you have the following prerequisites:
- Python: You should have Python installed on your system.
- PyTorch: Install PyTorch, which is a deep learning framework that will be the core of our image classification system.
You can install it via pip:
Dataset: You'll need a dataset of labeled images for training and testing your model. You can use publicly available datasets like CIFAR-10, ImageNet, or create your own ytorch image classification custom dataset.
Steps to Build an Image Classification System
1. Import Libraries
These libraries and modules provide the foundation for building and training an image classification model with PyTorch. We'll use torchvision to load and preprocess datasets, and torch.nn to define our neural network architecture. torch.optim is used to define the optimizer that updates the model's weights during training.
In this code cell, we import essential Python libraries and PyTorch modules.
We import torch for general PyTorch functionality. torchvision is used for working with vision datasets, models, and transformations. torch.nn is PyTorch's neural network module for defining and training neural networks. torch.optim provides optimization algorithms like SGD (Stochastic Gradient Descent) for updating model weights during training.
2. Prepare the Dataset
In this step, you need to load and preprocess your dataset. PyTorch provides convenient tools for handling datasets. Let's assume you're using the CIFAR-10 dataset:
Properly preparing the dataset is crucial for training a neural network. The transformations ensure that the data is in a suitable format for training. Data loaders help manage the data, handle batching, and shuffle the training data to ensure randomness during training.
In this code cell, we prepare our dataset for training and testing. We define a set of transformations (transform) to be applied to the images, including converting them to tensors and normalizing pixel values. We download and load the CIFAR-10 dataset using torchvision. We create data loaders (trainloader and testloader) to efficiently load and iterate through the training and test data in batches.
3. Define the Neural Network
Defining the neural network architecture is a fundamental step in building any deep learning model. In this case, we're using a Convolutional Neural Network (CNN) architecture, which is well-suited for image classification tasks. The network architecture determines the model's capacity and its ability to learn patterns and features from the input data.
You'll need to define your image classification model. A common choice is a Convolutional Neural Network (CNN):
In this code cell, we define the architecture of our neural network using the nn.Module class provided by PyTorch. The neural network architecture consists of two convolutional layers (self.conv1 and self.conv2) followed by fully connected layers (self.fc1, self.fc2, self.fc3). We define the forward pass in the forward method, specifying how the input data flows through the network.
4. Define Loss and Optimizer
The choice of loss function and optimizer is crucial for training a neural network effectively. Cross-entropy loss is commonly used for classification tasks. The optimizer is responsible for updating the model's weights during training to minimize the loss, and SGD is a popular optimization algorithm for this purpose.
Choose a loss function and an optimizer. For image classification, the cross-entropy loss is commonly used, and stochastic gradient descent (SGD) is a popular optimizer:
In this code cell, we define the loss function and the optimizer for training our neural network.
We use the cross-entropy loss (nn.CrossEntropyLoss()) for a classification task, where the model learns to predict class labels. The optimizer is set to SGD (Stochastic Gradient Descent) with a learning rate of 0.001 and momentum of 0.9.
5. Train the Model
Training is the process of optimizing the model's parameters (weights) so that it can make accurate predictions on new, unseen data. The training loop iterates through the dataset, adjusting the model's weights to minimize the loss, which measures the difference between predicted and actual labels.
Now, you can start training your model. Loop through the dataset and update the model's weights:
In this code cell, we implement the training loop for our neural network. We iterate through the dataset for multiple epochs, where each epoch is a complete pass through the entire training dataset. Within each epoch, we iterate through batches of data, compute predictions, calculate the loss, and update the model's weights using backpropagation and the optimizer.
6. Evaluate the Model
After training, it's essential to evaluate your model's performance on a separate test dataset. Evaluating the model on a test dataset helps us understand how well it generalizes to unseen data. Accuracy is a common metric used to measure the performance of classification models, indicating the percentage of correct predictions.
In this code cell, we evaluate the trained model's performance on a separate test dataset. We iterate through the test dataset, make predictions using the trained model, and calculate the accuracy of these predictions.
7. Save and Load the Model (Optional)
Saving the trained model allows you to use it for inference on new data or share it with others without retraining. Loading a saved model lets you reuse the trained weights and architecture, which can be especially useful when deploying a model in production.
You can save your trained model for future use and load it when needed:
In this code cell, we demonstrate how to save and load the trained model's weights. We save the model's state dictionary to a file with a specified path and extension. We also provide an example of loading the model's architecture and weights into a new model.
These code cells collectively outline the essential steps for building and training an image classification system with PyTorch. Understanding each step and its purpose is crucial for successfully developing deep learning models for image classification tasks.
Read our latest blog "What is Image Annotation"
Conclusion
In this article, we've walked through the process of building an pytorch image classification system using PyTorch. You've learned how to prepare a dataset, define a neural network, train the model, and evaluate its performance. Building and training image classification pytorch models is a crucial task in computer vision, and PyTorch provides a flexible and powerful framework to accomplish this. Remember that the specific details may vary depending on your dataset and model architecture, but the fundamental steps outlined here will serve as a solid foundation for your image classification using pytorch projects. Happy coding!


